
This topic will cover the process of installing, configuring, and fully launching your Mirakl integration for Veeqo. Start your journey with us here
Mirakl channel integration for Veeqo is a dynamic integration that supports every Mirakl-based marketplace, as long as the marketplace is in the production stage. The production stage means the marketplace is launched and fully functioning, allowing customers worldwide to access and order items.
Requirements
Before setting up your integration in Veeqo, please make sure that the following requirements are met:
1) The Mirakl marketplace should be in the production stage.
Mirakl marketplaces in the development & preproduction stages may not be supported because these other stages often lack the required features. Also, authorization is made by using an API key.
2) Your Mirakl store should be in "Open" status.
Pending, Suspended, or other store statuses can work with the API, but some features might not be accessible in these states, so we recommend that the store is fully open.
3) You should be using the main (admin) Mirakl marketplace account when authorizing.
Accounts with Limited permissions might not have the necessary access to API key generation, offer manipulation, etc. Having All permissions access gives the integration all the necessary permissions to fully employ integration features.
4) Offers have to be fully active in order to be downloaded to Veeqo.
In order to link offers to Veeqo offers, they must be in Active status, including prices and stock levels set. Any offers that are marked as Pending or in the Pending Offers list can not be linked.
5) Each Mirakl marketplace will require its own Veeqo channel.
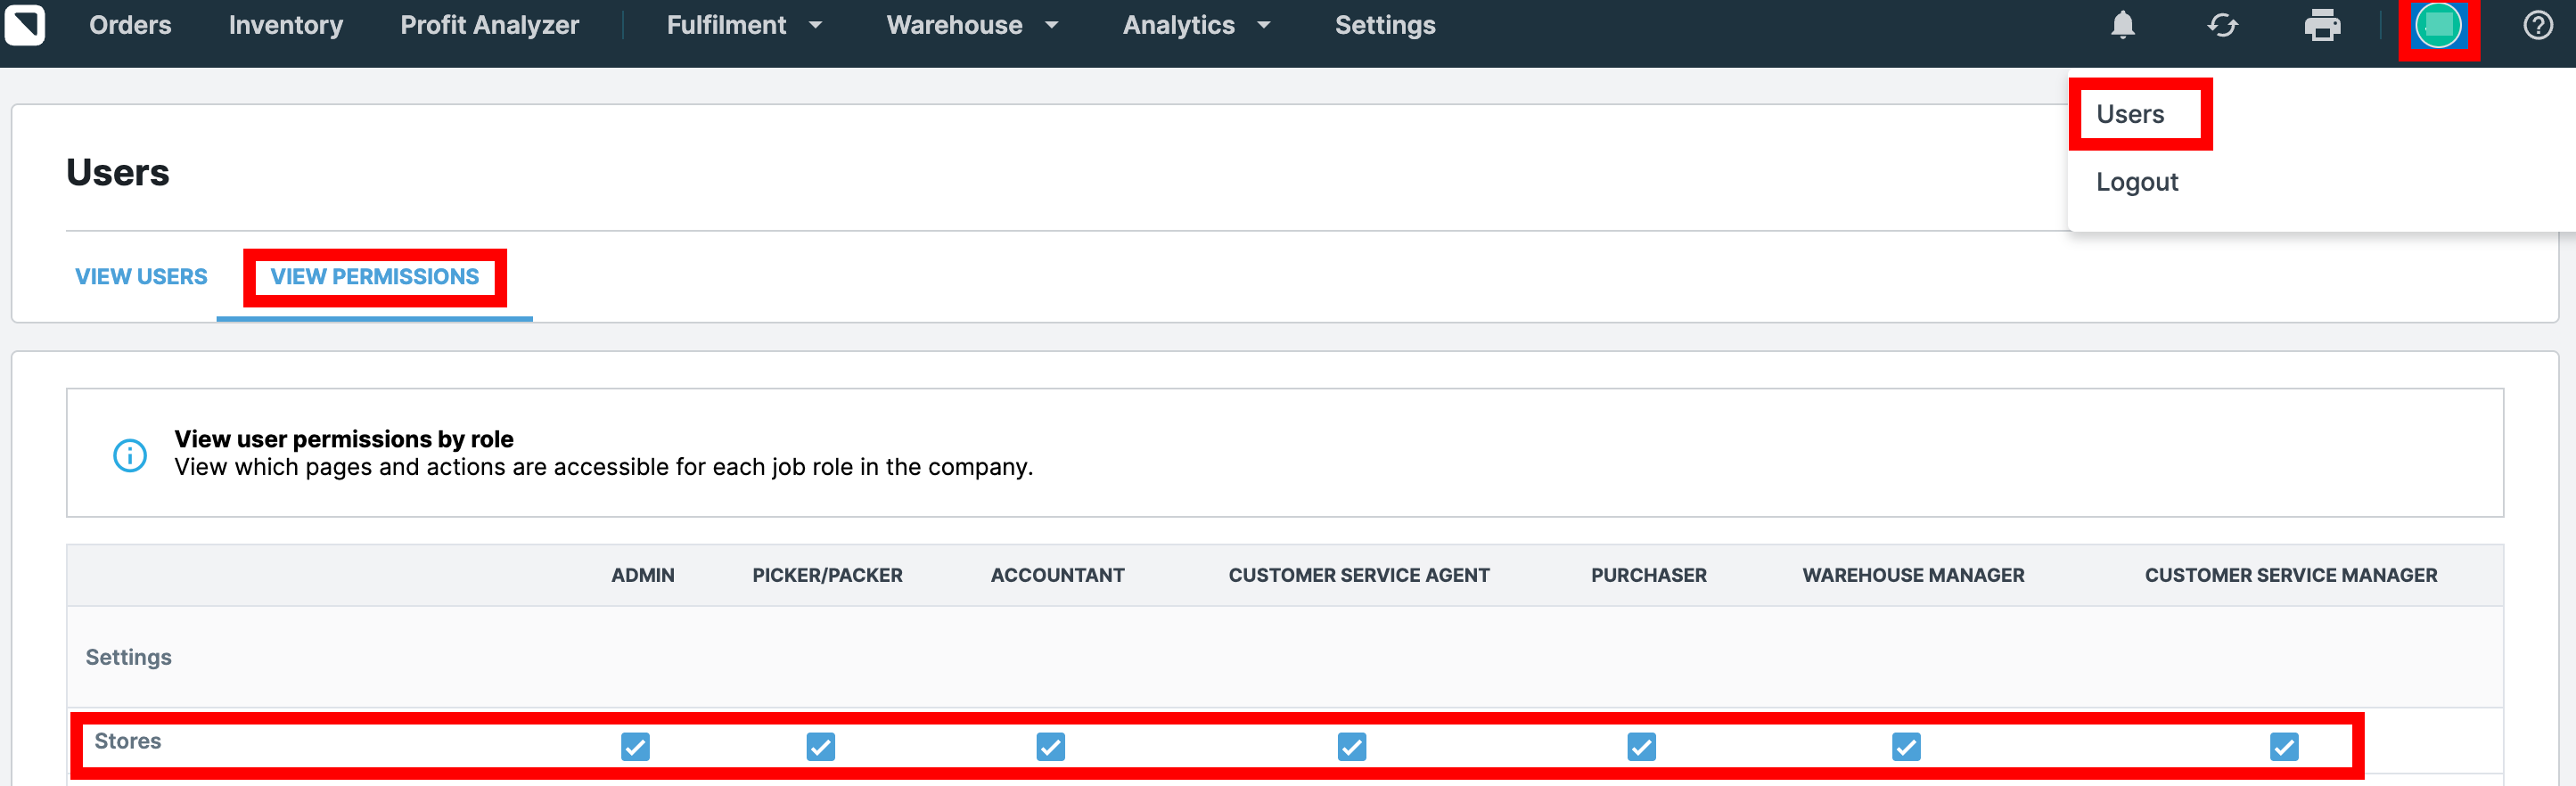
6) Please make sure the Veeqo user adding the Mirakl channel to Veeqo has an admin role or Store permission enabled in their Veeqo user settings. Preferably, you add the Mirakl channel by logging in to Veeqo with the Veeqo account owner login.
Permissions for User Roles can be managed only by the Veeqo account owner. You can see if Stores permission is enabled in your Veeqo account when logged in with the Veeqo account owner login under Users>View permissions:
General
Channel integration configuration is split into three different parts:
Installation;
Authorization;
Configuration after authorization.
Installation
To begin the process of adding the integration, head over to our Veeqo setup page.
This is an endpoint that will directly create a project specifically for the Mirakl channel integration for Veeqo.
1) When you first enter the page, you will be redirected back to the platform authentication page. There, register your account.
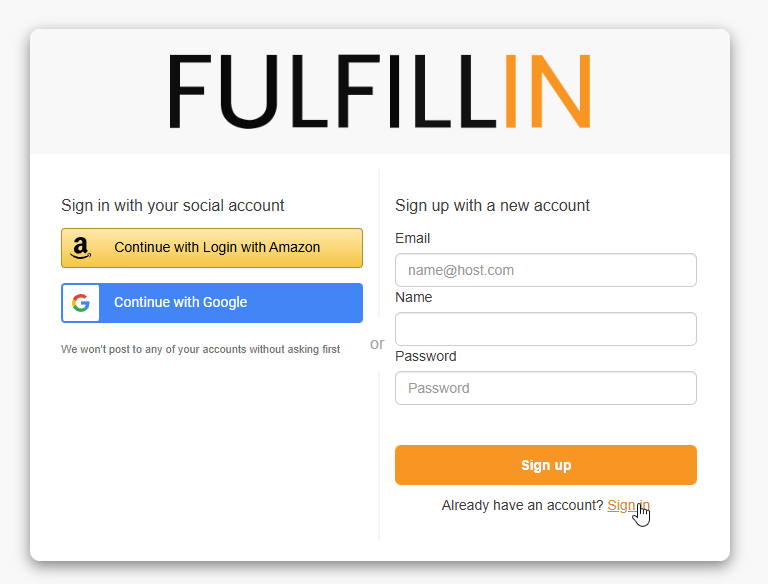
You can also use your existing Amazon or Google accounts for faster sign-up.
Afterwards, you will be shown the "Welcome to Fulfillin" page. Clicking continue will take you to all the information on the subscription plans. You can also change your preferred default currency at the top to view the prices.
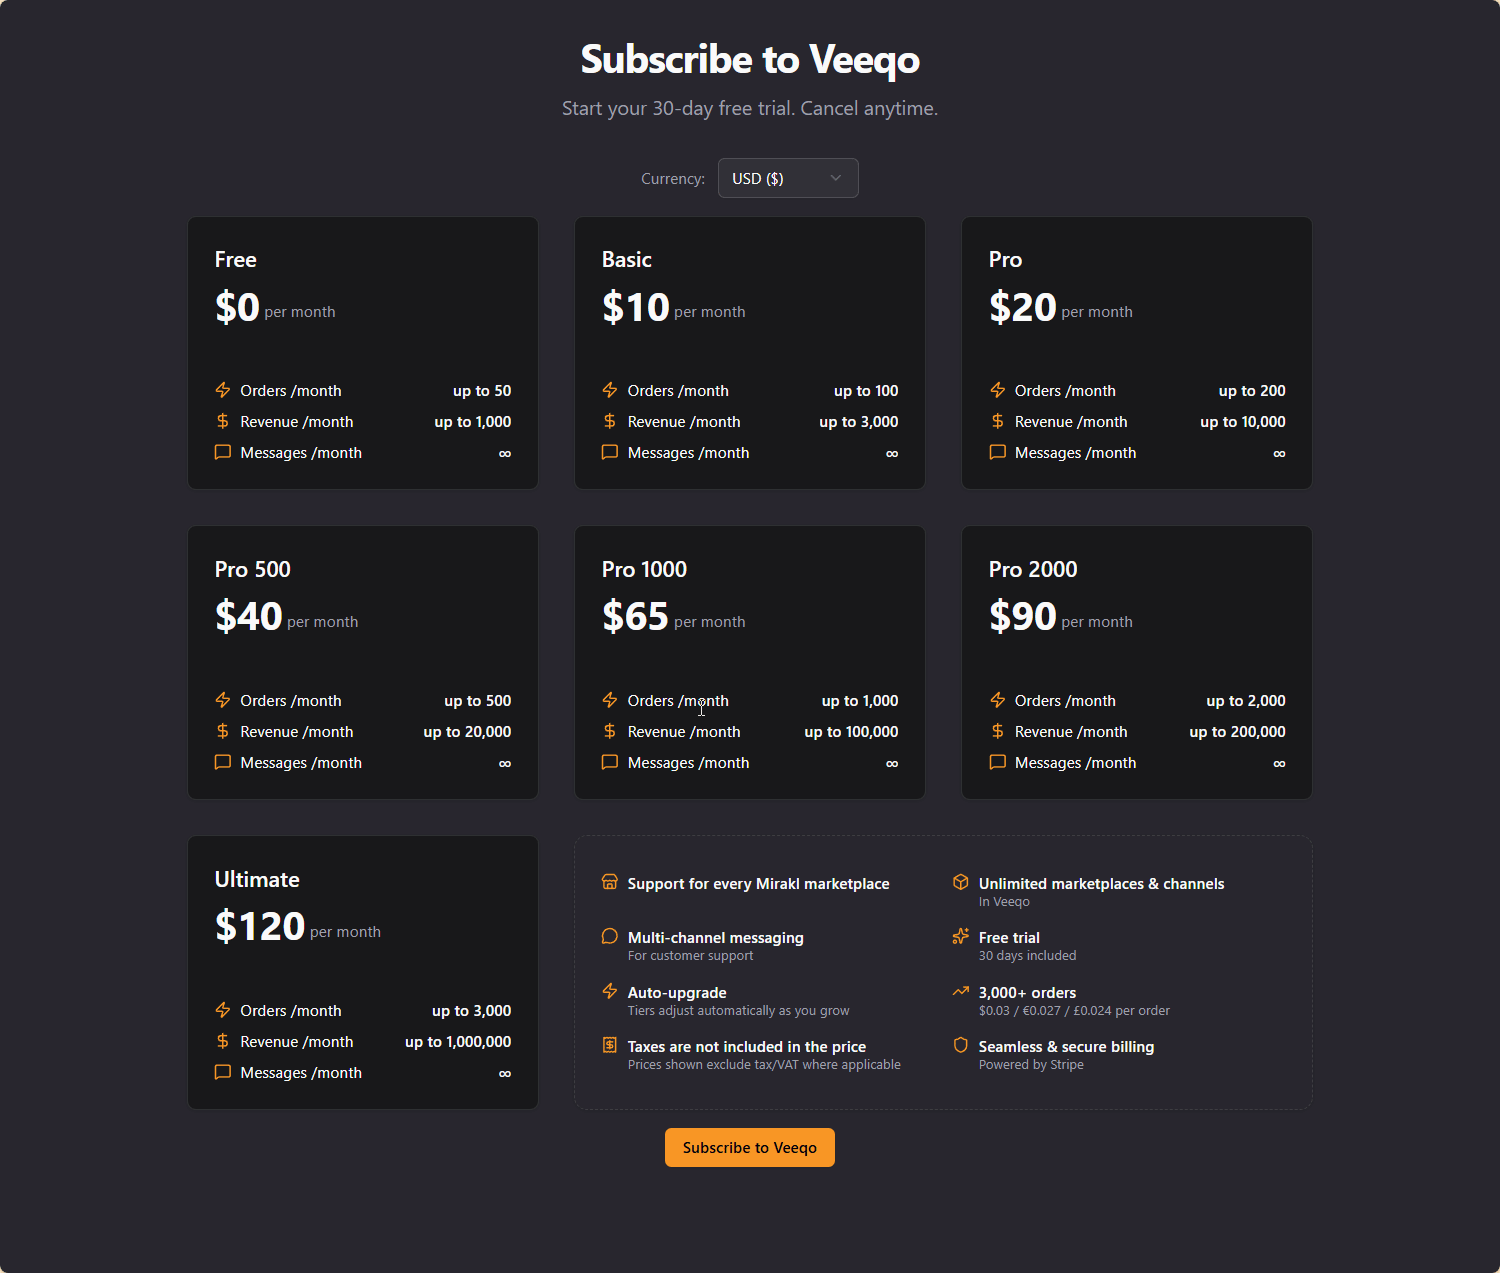
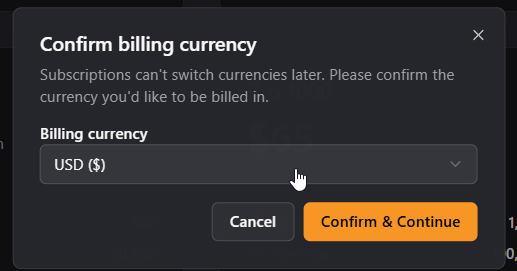
2) Afterwards, click the button at the bottom to start your subscription. Make sure to select your currency before clicking confirm!
3) You will be redirected to Stripe, where you can input all your company's details. If you want to receive invoices, don't forget to check the "I'm purchasing as a business" checkbox.
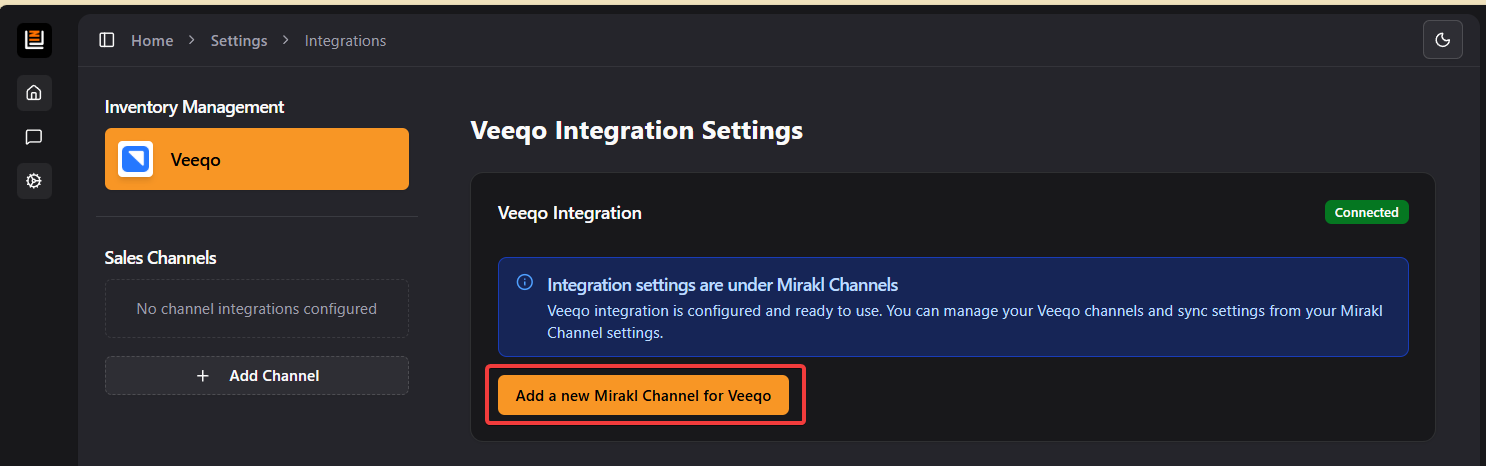
After subscription, you'll be redirected to the integration settings page with Veeqo already pre-selected as the Inventory Management integration. There you can again see the whole pricing list for reference as well as the main Authorization point for Veeqo.
4) ⚠️IMPORTANT⚠️: Make sure you are Logged In to Veeqo BEFORE authenticating, otherwise Veeqo will throw you straight to your open orders. Head to https://app.veeqo.com/ to log in if you're not, and then come back to the authorization page.
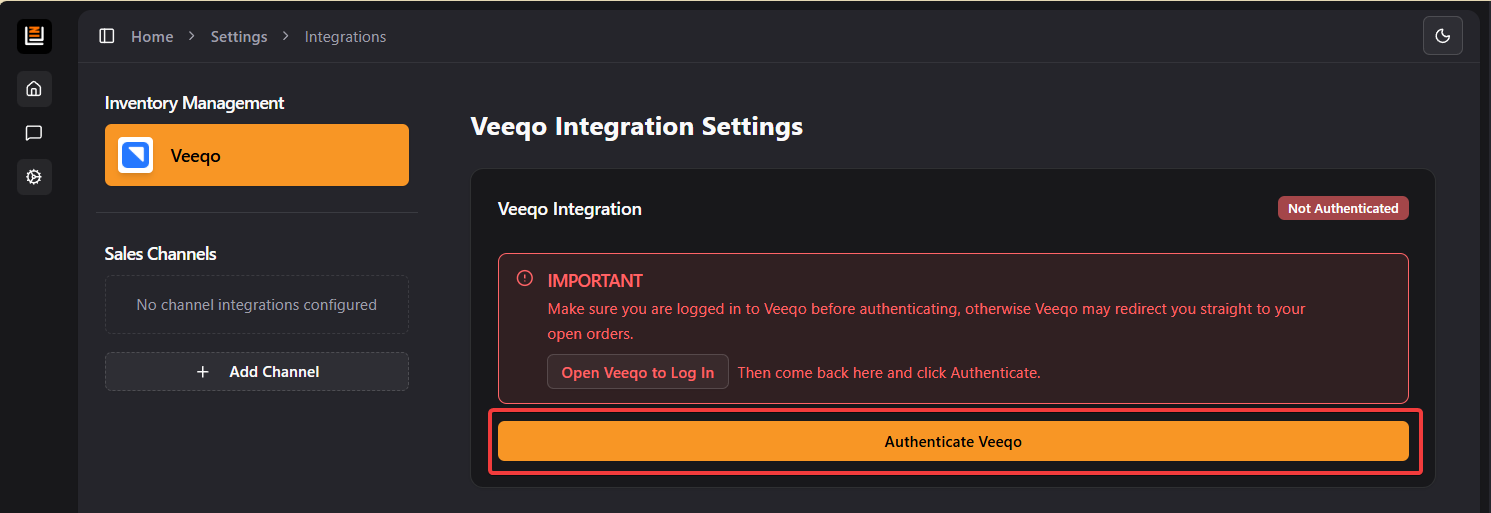
When you authorize Veeqo, you'll see the green badge that says "Connected".
5) To start, press the Add a new Mirakl Channel for Veeqo button.
Then you will see that a new Mirakl Integration authorization is opened and will present you with 5 fields.
The Shop Name - This will be inferred automatically when the authorization occurs, but you're free to change it as you wish.
The marketplace selector - This dropdown list includes all marketplaces for which we have information. When you select a marketplace, its API URL will be automatically pre-filled.
API URL - If a marketplace is not in the list, then you can manually input the API URL yourself. You can use the marketplace backoffice URL for that, for example, https://marketplace.kingfisher.com
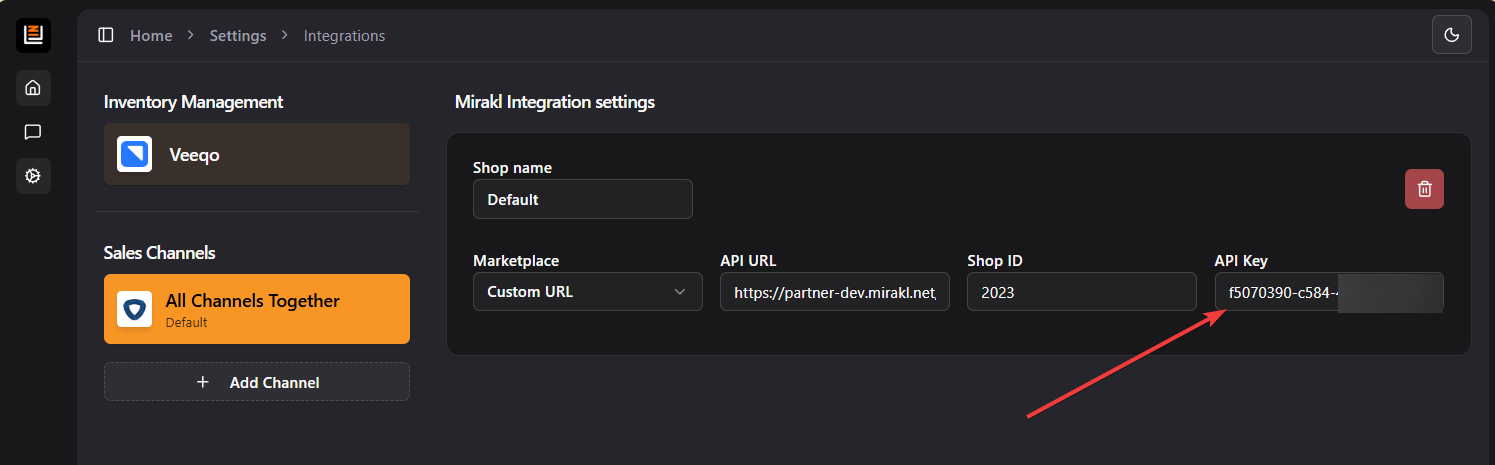
Shop ID - This is the unique shop ID generated for your store in your selected marketplace
API Key - Instructions on how to find the API key are below.
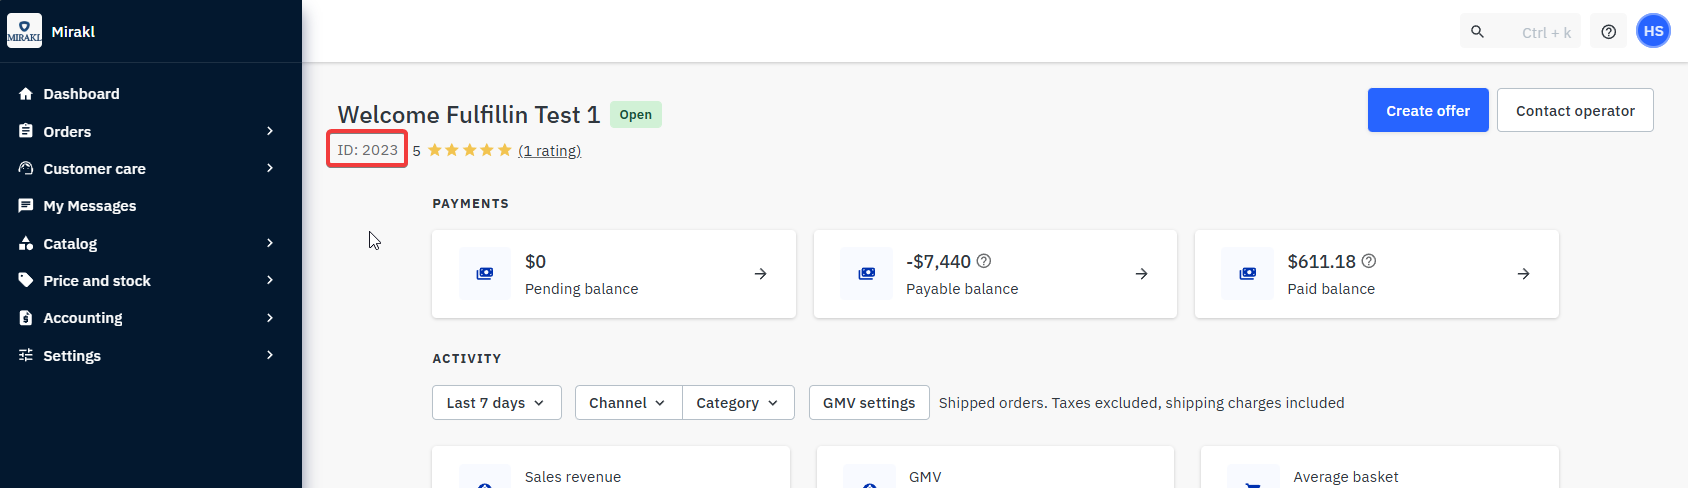
6) You can find your Shop ID in the dashboard of your Mirakl marketplace:
7) To find your API key:
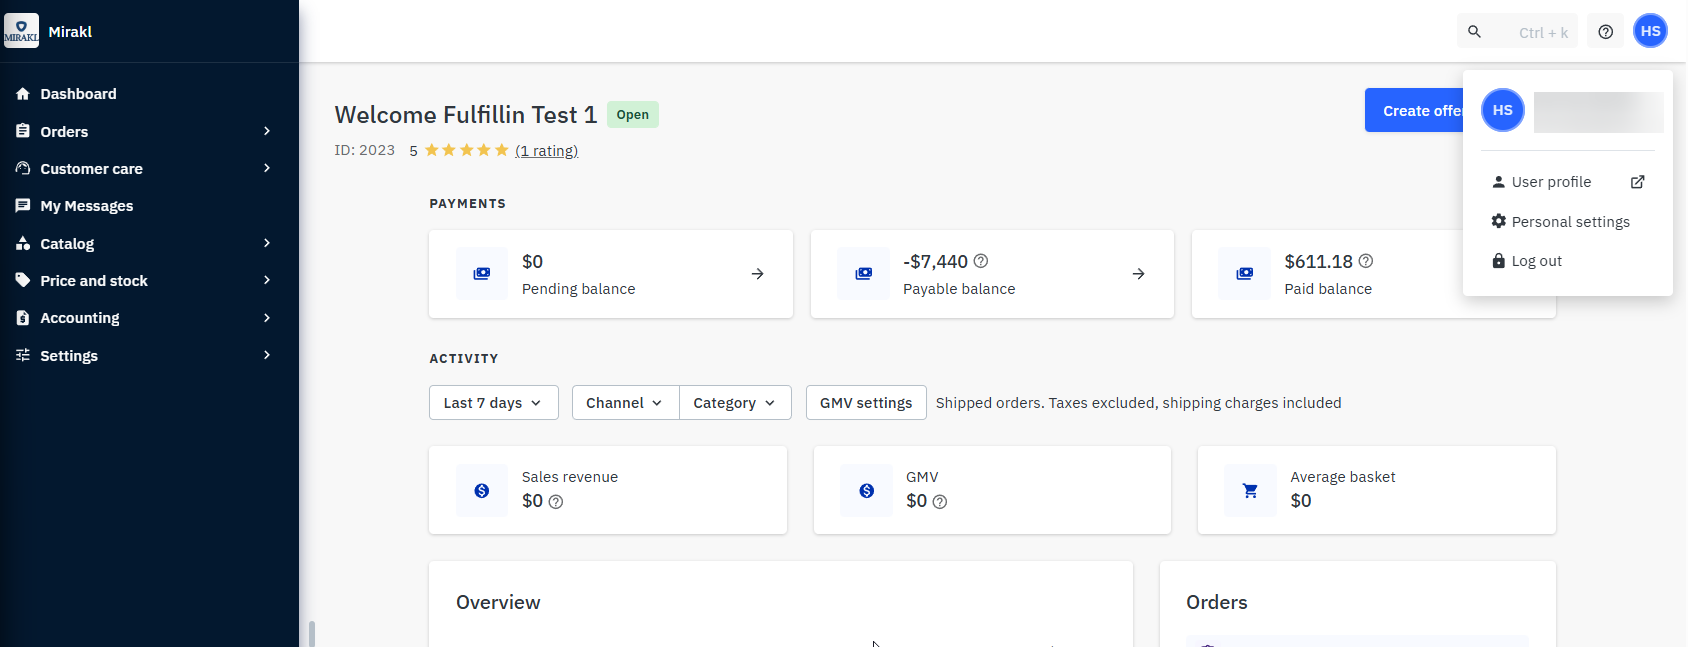
7.1) Navigate to the dashboard of your Mirakl marketplace and log in.
7.2) In the dashboard, click the top-right corner where your name is and select Personal settings.
7.3) From there, you navigate to the API key tab. Under Actions, select Generate new API key.
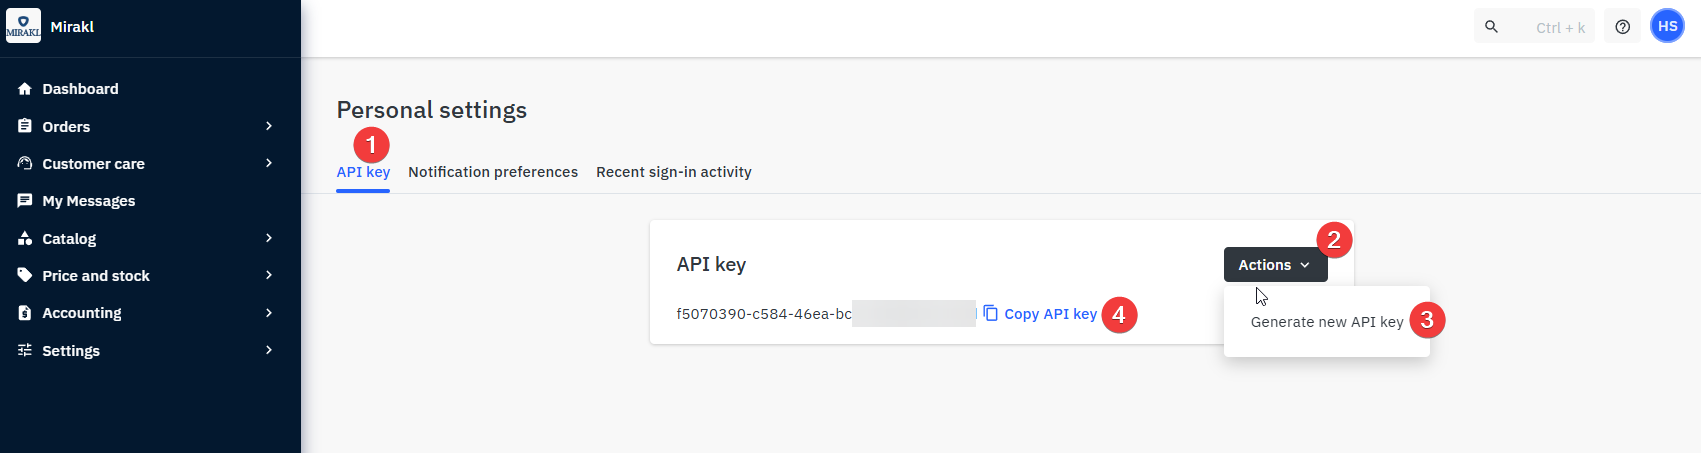
7.4) When it is generated, you can either copy it manually or press the Copy API key button.
7.5) Then, input the copied API key in the API key field.
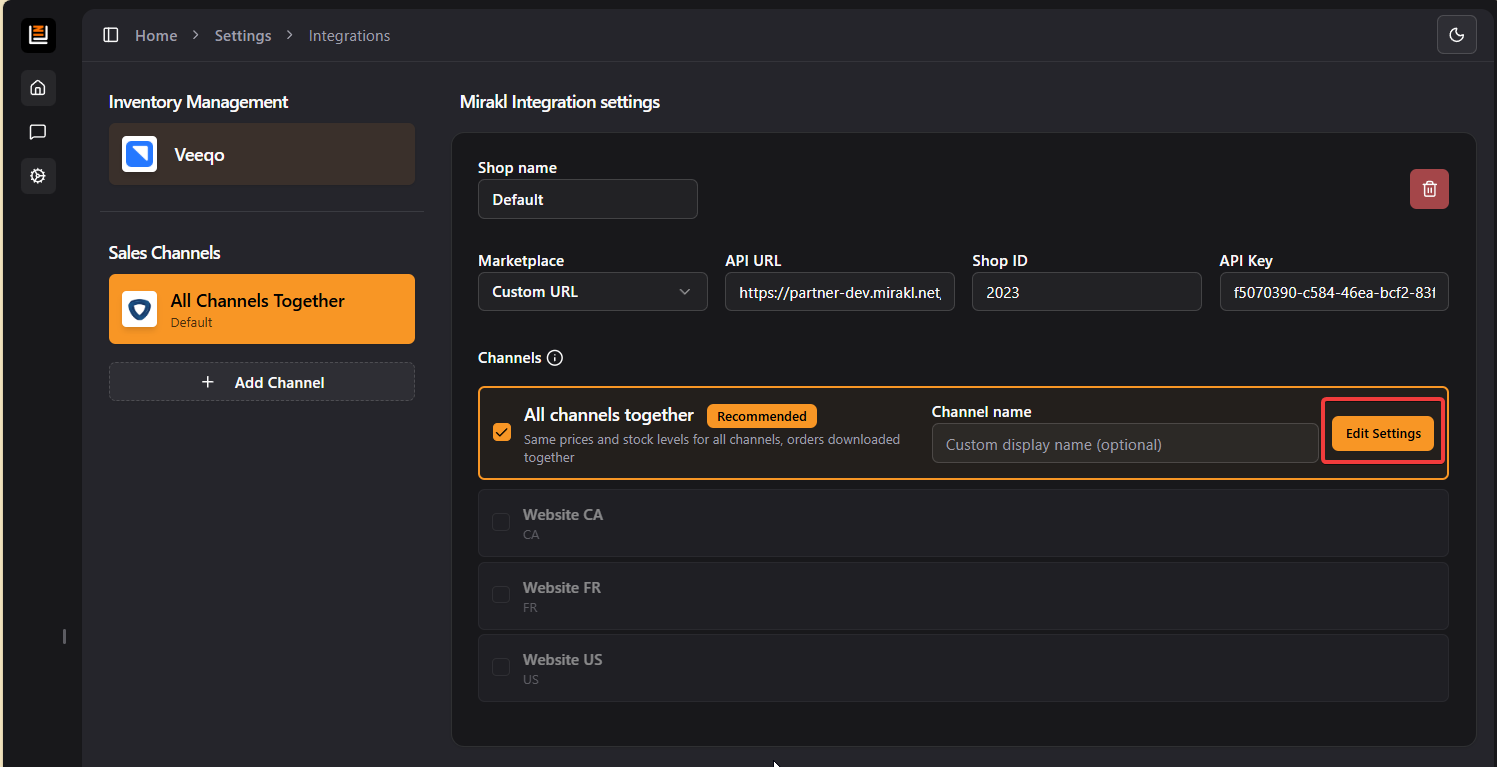
As soon as you fill all the fields all the authorization fields, the integration will auto-save and you will then see the Channels list for the marketplace (if it has any).
Afterwards, you have two options:
All channels together - uses the same settings, prices, and stock levels for all marketplace channels, and also downloads and dispatches orders in all marketplace channels.
Individual channels - please use this if the marketplace has more than 1 channel and you would like to differentiate your settings, stock, or prices between channels. If you'd like to differentiate your settings between the channels, then select the channels you'd wish to use, and it will automatically un-check the All Channels Together checkbox. This will create a separate Veeqo channel for each of your selected Mirakl channels.
8) When you've made your selection, press the "Edit settings" button to edit the specific Channel's settings.
Each channel's settings are split into 3 parts:
Shop Settings - These are settings that apply to all channels that have this specific authorization. Meaning that if you'd like to enable stock sync, the stock sync will happen across all selected channels.
Channel Settings - These settings apply only to this specific channel.
Veeqo Channel Settings - These settings apply only to the corresponding channel in Veeqo.
9) Before you start, input the channel name in the Channel settings section and then, if you do not see the Veeqo Channel settings, press the "Sync Channels Now" button.

After the channel is synced, it will now show up in your Veeqo integrations list too.
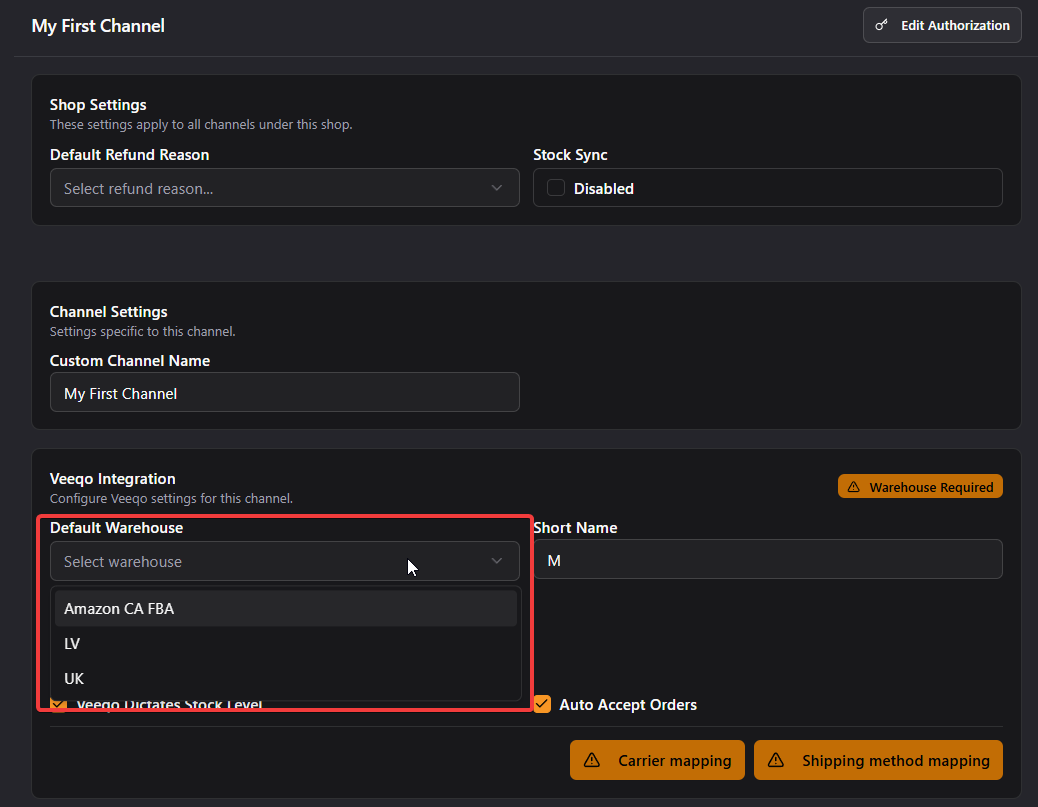
Before the integration can start working, you'll need to do 3 more steps.
10) Select your Default Warehouse. This warehouse will be used for stock syncing:
11) For order downloading, you will need to map your Veeqo Shipping methods against Mirakl shipping methods.
11.1) Press "Shipping method mapping" to open the mapping dialog
11.2) There, you need to select the Veeqo shipping mapping against the Mirakl shipping mappings you use.

12) For order dispatching, you will need to map your Veeqo carriers against the Mirakl carriers. Press the Carrier mapping to open the mapping dialog and repeat the same steps as for the Shipping Method mapping. There is no need to map carriers that you do not use.
13) After the warehouse is selected and at least one carrier and shipping method mapping is done, you need to Start Integration Sync to push your changes to Veeqo.
14) You'll see an alert for you to confirm that all the settings are saved and sent to Veeqo, as well as that mapping is done. If everything looks alright, you can press Start Sync.
Note: You only need to do this synchronisation after you add a new Mirakl Marketplace. You do not need to do this after every change.
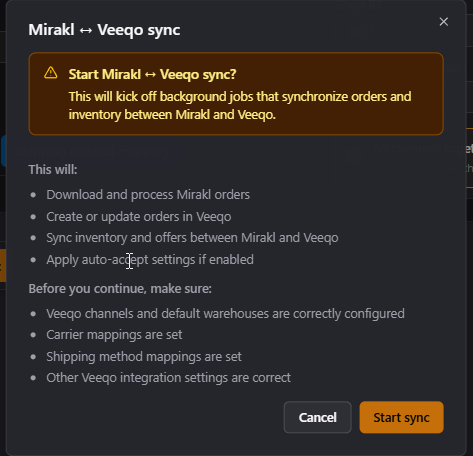
After starting the sync, inventory and offer downloads will run in the background, and you'll begin receiving incoming orders in the next few minutes.
If you are stuck on any step or need extra help/information, please do not hesitate to contact us via the chat in the bottom-right corner!